Tuesday, December 4, 2012

Glitter Pumpkins


With a supply of pumpkins and more than enough glitter on hand, I thought I would make some glitter-embellished pumpkins. Let me show you.


Here's what you'll need: 
Pumpkins
Glitter
Glue or Mod Podge
Paintbrush

First, give your pumpkins a quick wash to remove any dirt. 

After your pumpkins are dry, it's time to let the glitter fly!

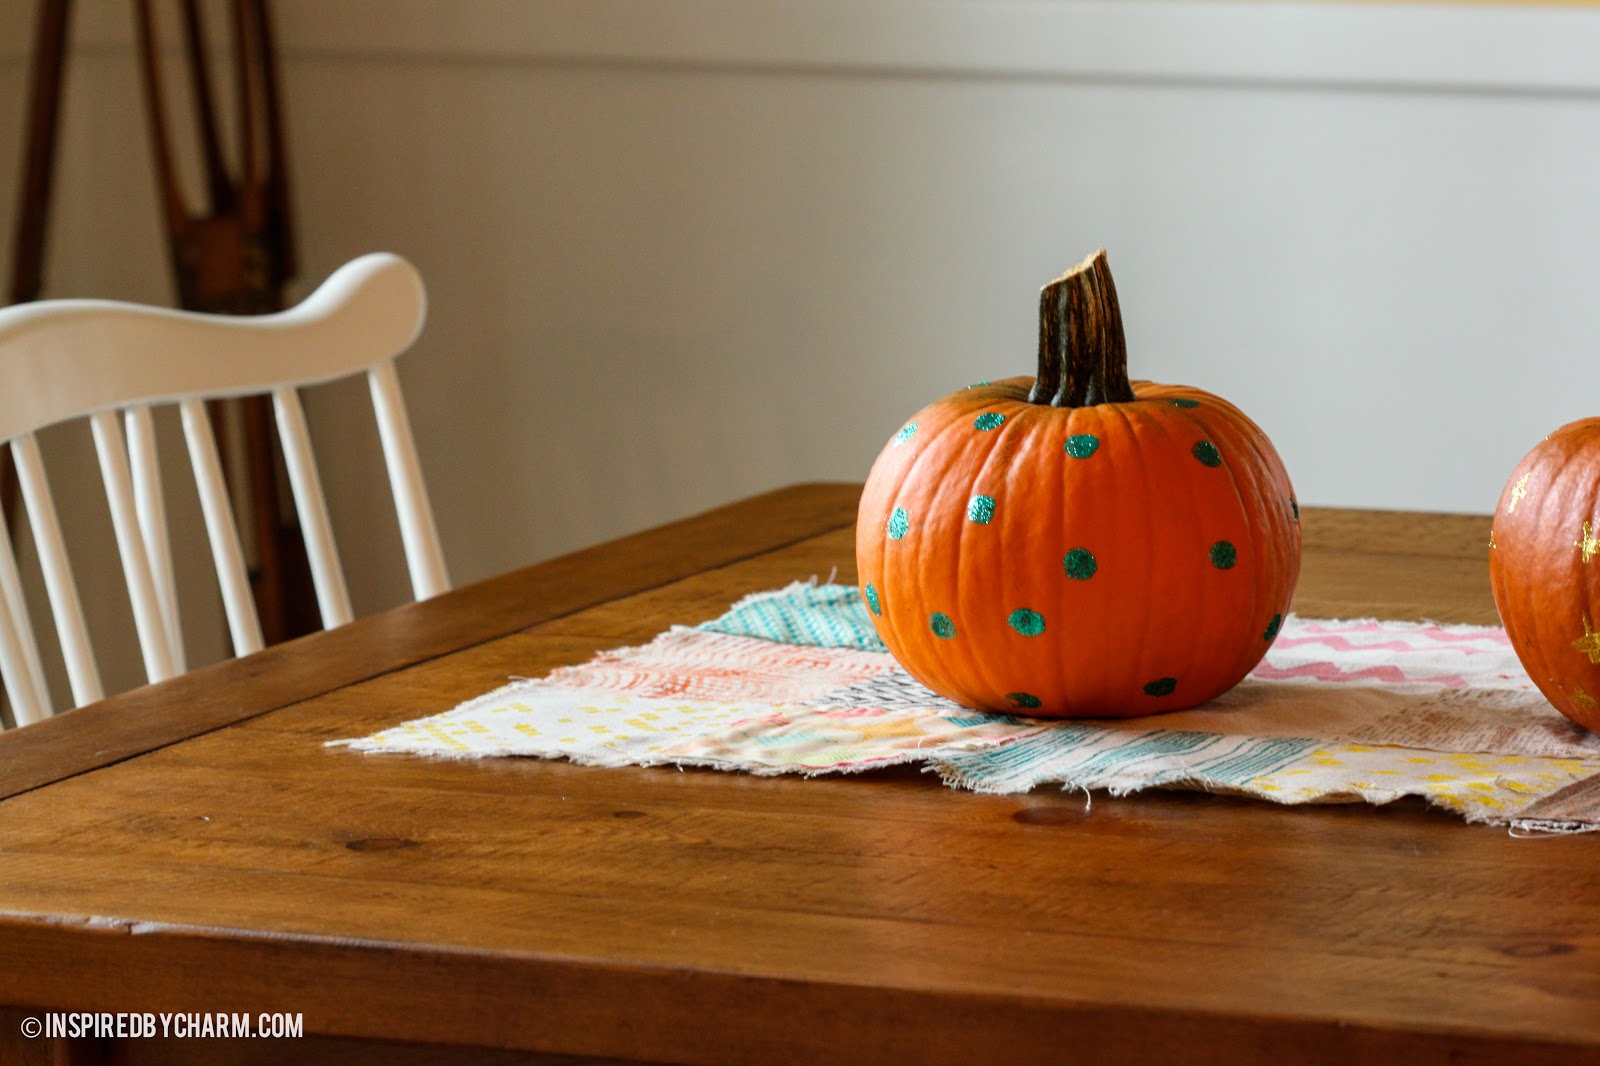
For my first pumpkin, I used some paint in an easy-to-use bottle. You can find paint or glue like this at any craft store. 


After I had my design, I sprinkled it with glitter, then let it dry completely.


For my other pumpkins, I just used Mod Podge and a paintbrush to paint on my designs.


I worked in sections, painting on the Mod Podge and then applying the glitter. 

After the glitter was set and everything was dry, I used a large paintbrush to brush off any excess glitter.

After that, my pumpkins were ready to go!


Pretty cute, right? A festive look for my dining room. 


I pulled my designs and colors from a table runner that I also made this weekend. More on that Wednesday.


As much as I love carving pumpkins, I think painted, or in my case, glittered pumpkins, seem to last so much longer. 


That's it! Some new fun, festive, and sparkly decor. 


I'm saving the washi tape and stamper for jazzing up my envelopes. 


Too fun, right? The sayings on this thing kill me. I'm going to have a lot of fun with this!

For more information about these and other supplies, you can connect with Consumer Crafts on Twitter, Facebook, Pinterest, and their blog.


And don't forget to tell your friends about Consumer Crafts for a chance to win $250 in their Refer a Friend contest! You can win $250 worth of prizes!


That's it!

Did you do any crafting this weekend? What's your favorite way to decorate pumpkins?


Disclosure: This post was compensated by Consumer Crafts as a part of Blueprint Social . 
Please note I only share products I love and believe my readers would enjoy. 

"For the Love of Pattern" Table Runner


You'll notice the end result turned out a little more all-season than fall specific, but that's one of the things I love about crafting. Like Forest Gump said, "You never know what you're going to get." I decided to go with a mixed media feel using both paint and fabric to create a really unique look!


Let's get started!

Here's what you'll need:
Martha Stewart Crafts Pattern Stencils
Martha Stewart Crafts Paint Brushes 
Piece of drop cloth or fabric of your choice - Mine is 65" x 15"
Scraps of coordinating fabric, cut into 5" squares
Sewing machine 
Thread
Scissors

(If you don't have a sewing machine or are not comfortable using one, no worries! Just skip the last few steps and paint a few extra blocks.)

First, cut the fabric you are going to use for the base of your runner. I used a drop cloth because I had it on hand. I also wanted something with a natural look that was neutral and sturdy. Drop cloths can be found in the paint section of most hardware and home stores.

I cut my fabric to 65" x 15" because this would allow me to work in five-inch squares. 


Next, you will need to prep your surface for painting by taping off your squares. This is a bit tedious, but totally worth it in the end. You will need to work in sections. Begin by taping off every other row. 


Then, tape off the two outer squares in each row. Remember, you are taping to create five-inch squares.


Now you are ready to paint! Grab your stencil and paint and begin applying your choice of color. 


When you are finished, carefully remove the stencil.


Do this for all of the squares you have taped off. Keep in mind that later you will be adding patches of fabric to some of the squares, so you can leave a few blank here and there. Random is best.

Once the paint is dry, remove the tape that made the two outer squares. Then, tape off all of the inner squares. 

Again, using your paint and stencil, paint in your design.


Once the paint is dry repeat the steps above for the opposite rows. Don't forget to leave a few blank squares.


When all the paint is dry and you have removed the tape, you are ready to add a few pieces of fabric. 


Pin your pieces of coordinating fabric to the areas of the runner where you'd like them.


Then, using your sewing machine, stitch a quarter of an inch on each side of every seam. This step secures the fabric squares and gives your finished runner a quilted look.


Trim off any loose or extraneous trends, and you are finished! 


Like I said, feel free to leave out the fabric and sewing element. You will still have a fabulous runner with a quilted look, minus the sewing. How cool is that?


I'm all about mixing patterns and materials these days. This project really allowed me to explore that idea. 


I'm loving the results! My glittered pumpkins looks pretty cute on it too. Don't you think?


This was also my first time using Martha Stewart Crafts products. They are fabulous just as you would expect. For more inspiration and product ideas, visit Plaid's website or reach out to them on FacebookTwitter, and Pinterest


What do you think of my new table runner?